An interactive Git Tutorial: the tool you didn’t know you needed
From personal workflows to open collaboration
Note: this tutorial was particularly modeled, and therefore owes a lot, to the excellent materials offered in:
- “Git for Scientists: A Tutorial” by John McDonnell
- Emanuele Olivetti’s lecture notes and exercises from the G-Node summer school on Advanced Scientific Programming in Python.
In particular I’ve reused the excellent images from the Pro Git book that John had already selected and downloaded, as well as some of his outline. But this version of the tutorial aims to be 100% reproducible by being executed directly as an IPython notebook and is hosted itself on github so that others can more easily make improvements to it by collaborating on Github. Many thanks to John and Emanuele for making their materials available online.
After writing this document, I discovered J.R. Johansson’s tutorial on version control that is also written as a fully reproducible notebook and is also aimed at a scientific audience. It has a similar spirit to this one, and is part of his excellent series Lectures on Scientific Computing with Python that is entirely available as IPython Notebooks.
Wikipedia
“Revision control, also known as version control, source control or software configuration management (SCM), is the management of changes to documents, programs, and other information stored as computer files.”
Reproducibility?
- Tracking and recreating every step of your work
- In the software world: it’s called Version Control!
What do (good) version control tools give you?
- Peace of mind (backups)
- Freedom (exploratory branching)
- Collaboration (synchronization)
Git is an enabling technology: Use version control for everything
- Paper writing (never get
paper_v5_john_jane_final_oct22_really_final.texby email again!) - Grant writing
- Everyday research
- Teaching (never accept an emailed homework assignment again!)
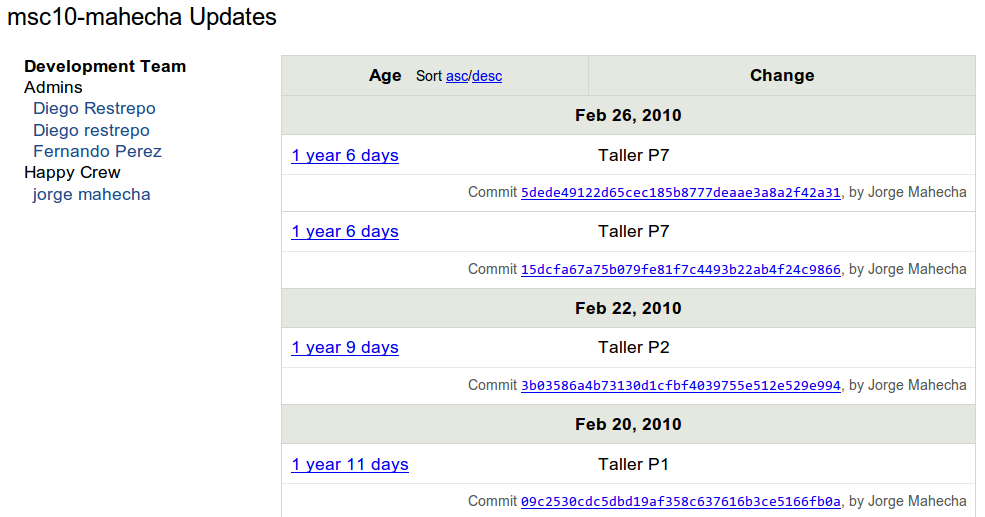
Teaching courses with Git
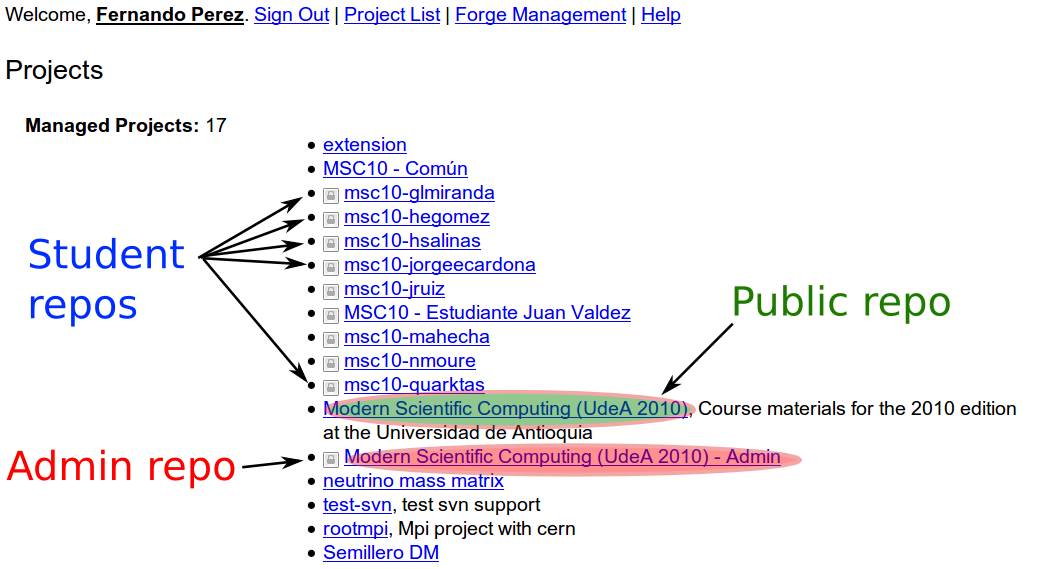
Annotated history of each student’s worfklow (and backup!)
The plan for this tutorial
This tutorial is structured in the following way: we will begin with a brief overview of key concepts you need to understand in order for git to really make sense. We will then dive into hands-on work: after a brief interlude into necessary configuration we will discuss 5 “stages of git” with scenarios of increasing sophistication and complexity, introducing the necessary commands for each stage:
- Local, single-user, linear workflow
- Single local user, branching
- Using remotes as a single user
- Remotes for collaborating in a small team
- Full-contact github: distributed collaboration with large teams
In reality, this tutorial only covers stages 1-4, since for #5 there are many software develoment-oriented tutorials and documents of very high quality online. But most scientists start working alone with a few files or with a small team, so I feel it’s important to build first the key concepts and practices based on problems scientists encounter in their everyday life and without the jargon of the software world. Once you’ve become familiar with 1-4, the excellent tutorials that exist about collaborating on github on open-source projects should make sense.
Very high level picture: an overview of key concepts
The commit: a snapshot of work at a point in time
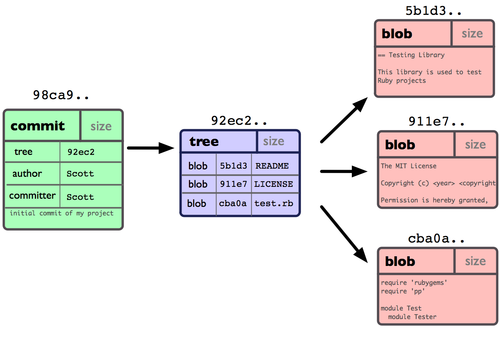
Credit: ProGit book, by Scott Chacon, CC License.
In [1]:
ls
Git-Tutorial.ipynb fig/ gh-token
A repository: a group of linked commits
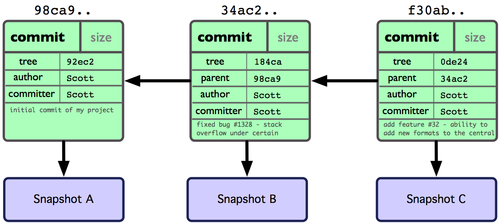
Note: these form a Directed Acyclic Graph (DAG), with nodes identified by their hash.
A hash: a fingerprint of the content of each commit and its parent
In [2]:
from hashlib import sha1

# Our first commit
data1 = b'This is the start of my paper.'
meta1 = b'date: 1/1/17'
hash1 = sha1(data1 + meta1).hexdigest( )
print('Hash:', hash1)
Hash: 3b32905baabd5ff22b3832c892078f78f5e5bd3b
In [5]:
# Our second commit, linked to the first
data2 = b'Some more text in my paper...'
meta2 = b'date: 1/2/1'
# Note we add the parent hash here!
hash2 = sha1(data2 + meta2 + hash1.encode()).hexdigest()
print('Hash:', hash2)
Hash: 1c12d2aad51d5fc33e5b83a03b8787dfadde92a4
And this is pretty much the essence of Git!
First things first: git must be configured before first use
The minimal amount of configuration for git to work without pestering you is to tell it who you are:
In [6]:
%%bash
git config --global user.name "Fernando Perez"
git config --global user.email "Fernando.Perez@berkeley.edu"
And while we’re at it, we also turn on the use of color, which is very useful
In [7]:
%%bash
git config --global color.ui "auto"
Set git to use the credential memory cache so we don’t have to retype passwords too frequently.
Github offers in its help pages instructions on how to configure the credentials helper for Mac OSX, Windows and Linux.
Stage 1: Local, single-user, linear workflow
Type git to see a full list of all the ‘core’ commands. We’ll now go
through most of these via small practical exercises:
In [8]:
!git
usage: git [--version] [--help] [-C <path>] [-c name=value]
           [--exec-path[=<path>]] [--html-path] [--man-path] [--info-path]
           [-p | --paginate | --no-pager] [--no-replace-objects] [--bare]
           [--git-dir=<path>] [--work-tree=<path>] [--namespace=<name>]
           <command> [<args>]

These are common Git commands used in various situations:

start a working area (see also: git help tutorial)
   clone      Clone a repository into a new directory
   init       Create an empty Git repository or reinitialize an existing one

work on the current change (see also: git help everyday)
   add        Add file contents to the index
   mv         Move or rename a file, a directory, or a symlink
   reset      Reset current HEAD to the specified state
   rm         Remove files from the working tree and from the index

examine the history and state (see also: git help revisions)
   bisect     Use binary search to find the commit that introduced a bug
   grep       Print lines matching a pattern
   log        Show commit logs
   show       Show various types of objects
   status     Show the working tree status

grow, mark and tweak your common history
   branch     List, create, or delete branches
   checkout   Switch branches or restore working tree files
   commit     Record changes to the repository
   diff       Show changes between commits, commit and working tree, etc
   merge      Join two or more development histories together
   rebase     Reapply commits on top of another base tip
   tag        Create, list, delete or verify a tag object signed with GPG

collaborate (see also: git help workflows)
   fetch      Download objects and refs from another repository
   pull       Fetch from and integrate with another repository or a local branch
   push       Update remote refs along with associated objects

'git help -a' and 'git help -g' list available subcommands and some
concept guides. See 'git help <command>' or 'git help <concept>'
to read about a specific subcommand or concept.
git init: create an empty repository
In [9]:
%%bash
rm -rf test
git init test
Initialized empty Git repository in /Users/fperez/teach/berkeley/2017-stat159/stat159/lectures/01-git/test/.git/
Note: all these cells below are meant to be run by you in a terminal
where you change once to the test directory and continue working
there.
Since we are putting all of them here in a single notebook for the purposes of the tutorial, they will all be prepended with the first two lines:
%%bash
cd test
that tell IPython to do that each time. But you should ignore those two lines and type the rest of each cell yourself in your terminal.
Let’s look at what git did:
In [10]:
%%bash
cd test

ls
In [11]:
%%bash
cd test

ls -la
total 0
drwxr-xr-x  3 fperez  staff  102 Sep  6 23:24 .
drwxr-xr-x  8 fperez  staff  272 Sep  6 23:24 ..
drwxr-xr-x  9 fperez  staff  306 Sep  6 23:24 .git
In [12]:
%%bash
cd test

ls -l .git
total 24
-rw-r--r--   1 fperez  staff   23 Sep  6 23:24 HEAD
-rw-r--r--   1 fperez  staff  137 Sep  6 23:24 config
-rw-r--r--   1 fperez  staff   73 Sep  6 23:24 description
drwxr-xr-x  12 fperez  staff  408 Sep  6 23:24 hooks
drwxr-xr-x   3 fperez  staff  102 Sep  6 23:24 info
drwxr-xr-x   4 fperez  staff  136 Sep  6 23:24 objects
drwxr-xr-x   4 fperez  staff  136 Sep  6 23:24 refs
Now let’s edit our first file in the test directory with a text editor… I’m doing it programatically here for automation purposes, but you’d normally be editing by hand
In [13]:
%%bash
cd test

echo "My first bit of text" > file1.txt
git add: tell git about this new file
In [14]:
%%bash
cd test

git add file1.txt
We can now ask git about what happened with status:
In [15]:
%%bash
cd test

git status
On branch master

No commits yet

Changes to be committed:
  (use "git rm --cached <file>..." to unstage)

        new file:   file1.txt
git commit: permanently record our changes in git’s database
For now, we are always going to call git commit either with the
-a option or with specific filenames
(git commit file1 file2...). This delays the discussion of an aspect
of git called the index (often referred to also as the ‘staging area’)
that we will cover later. Most everyday work in regular scientific
practice doesn’t require understanding the extra moving parts that the
index involves, so on a first round we’ll bypass it. Later on we will
discuss how to use it to achieve more fine-grained control of what and
how git records our actions.
In [16]:
%%bash
cd test

git commit -a -m"This is our first commit"
[master (root-commit) 8ce7775] This is our first commit
 1 file changed, 1 insertion(+)
 create mode 100644 file1.txt
In the commit above, we used the -m flag to specify a message at the
command line. If we don’t do that, git will open the editor we specified
in our configuration above and require that we enter a message. By
default, git refuses to record changes that don’t have a message to go
along with them (though you can obviously ‘cheat’ by using an empty or
meaningless string: git only tries to facilitate best practices, it’s
not your nanny).
git log: what has been committed so far
In [17]:
%%bash
cd test

git log
commit 8ce7775da6ee3d042f78924aa1904154fd4c92f8
Author: Fernando Perez <Fernando.Perez@berkeley.edu>
Date:   Wed Sep 6 23:24:25 2017 -0700

    This is our first commit
git diff: what have I changed?
Let’s do a little bit more work… Again, in practice you’ll be editing the files by hand, here we do it via shell commands for the sake of automation (and therefore the reproducibility of this tutorial!)
In [18]:
%%bash
cd test

echo "And now some more text..." >> file1.txt
And now we can ask git what is different:
In [19]:
%%bash
cd test

git diff
diff --git a/file1.txt b/file1.txt
index ce645c7..4baa979 100644
--- a/file1.txt
+++ b/file1.txt
@@ -1 +1,2 @@
 My first bit of text
+And now some more text...
The format of the output above is well explained in detail in this Stack Overflow post. But we can provide a brief summary here:
diff --git a/file1.txt b/file1.txt
This tells us which files changed overall, with ‘a’ representing the old path and ‘b’ the new one (in this case it’s the same file, though if a file had been renamed it would be different).
index ce645c7..4baa979 100644
These are hashes of the file at the two stages, needed by git itself for other operations with the diff output.
The next block shows the actual changes. The first two lines show which
paths are being compared (in this case the same file, file1.txt):
--- a/file1.txt
+++ b/file1.txt
The next line indicates where the changes happened. The format is
@@ from-file-range to-file-range @@, where there’s one more @
character than there’s parents to the file comparison (git can handle
multi-way diff/merges), adn the file range format is
-/+<start line>,<# of lines>, with - for the from-file and
+ for the to-file:
@@ -1 +1,2 @@
Lines prepended with - correspond to deletions (none in this case),
and lines with + to additions. A few lines around
deletions/additions are shown for context:
 My first bit of text
+And now some more text...
The cycle of git virtue: work, commit, work, commit, …
In [20]:
%%bash
cd test

git commit -a -m"I have made great progress on this critical matter."
[master f0163df] I have made great progress on this critical matter.
 1 file changed, 1 insertion(+)
git log revisited
First, let’s see what the log shows us now:
In [21]:
%%bash
cd test

git log
commit f0163df7db81ece0345dccc6d975dec9d4d7529f
Author: Fernando Perez <Fernando.Perez@berkeley.edu>
Date:   Wed Sep 6 23:24:34 2017 -0700

    I have made great progress on this critical matter.

commit 8ce7775da6ee3d042f78924aa1904154fd4c92f8
Author: Fernando Perez <Fernando.Perez@berkeley.edu>
Date:   Wed Sep 6 23:24:25 2017 -0700

    This is our first commit
Sometimes it’s handy to see a very summarized version of the log:
In [22]:
%%bash
cd test

git log --oneline --topo-order --graph
* f0163df I have made great progress on this critical matter.
* 8ce7775 This is our first commit
Git supports aliases: new names given to command combinations. Let’s
make this handy shortlog an alias, so we only have to type git slog
and see this compact log:
In [23]:
%%bash
cd test

# We create our alias (this saves it in git's permanent configuration file):
git config --global alias.slog "log --oneline --topo-order --graph"

# And now we can use it
git slog
* f0163df I have made great progress on this critical matter.
* 8ce7775 This is our first commit
git mv and rm: moving and removing files
While git add is used to add fils to the list git tracks, we must
also tell it if we want their names to change or for it to stop tracking
them. In familiar Unix fashion, the mv and rm git commands do
precisely this:
In [24]:
%%bash
cd test

git mv file1.txt file-newname.txt
git status
On branch master
Changes to be committed:
  (use "git reset HEAD <file>..." to unstage)

        renamed:    file1.txt -> file-newname.txt
Note that these changes must be committed too, to become permanent! In git’s world, until something hasn’t been committed, it isn’t permanently recorded anywhere.
In [25]:
%%bash
cd test

git commit -a -m"I like this new name better"
echo "Let's look at the log again:"
git slog
[master 258b69f] I like this new name better
 1 file changed, 0 insertions(+), 0 deletions(-)
 rename file1.txt => file-newname.txt (100%)
Let's look at the log again:
* 258b69f I like this new name better
* f0163df I have made great progress on this critical matter.
* 8ce7775 This is our first commit
And git rm works in a similar fashion.
Exercise
Add a new file file2.txt, commit it, make some changes to it, commit
them again, and then remove it (and don’t forget to commit this last
step!).
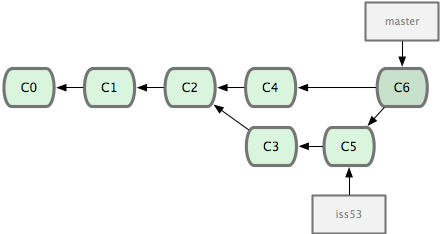
Local user, branching
What is a branch? Simply a label for the ‘current’ commit in a sequence of ongoing commits:
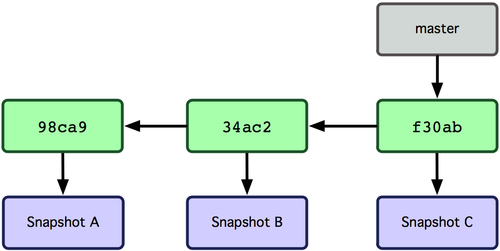
There can be multiple branches alive at any point in time; the working directory is the state of a special pointer called HEAD. In this example there are two branches, master and testing, and testing is the currently active branch since it’s what HEAD points to:
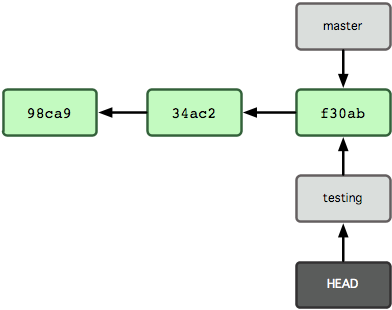
Once new commits are made on a branch, HEAD and the branch label move with the new commits:
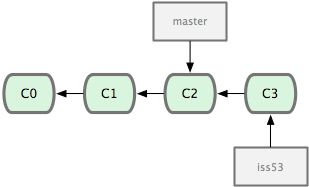
This allows the history of both branches to diverge:
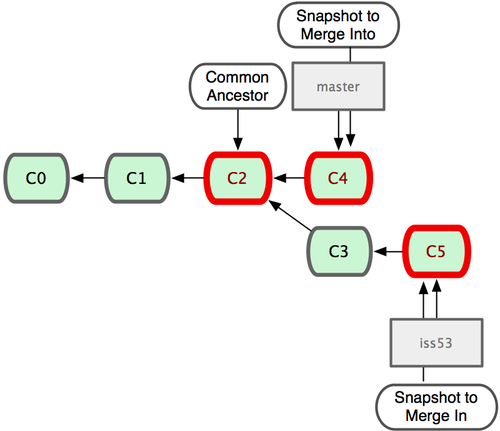
But based on this graph structure, git can compute the necessary information to merge the divergent branches back and continue with a unified line of development:
Let’s now illustrate all of this with a concrete example. Let’s get our bearings first:
In [26]:
%%bash
cd test

git status
ls
On branch master
nothing to commit, working tree clean
file-newname.txt
We are now going to try two different routes of development: on the
master branch we will add one file and on the experiment branch,
which we will create, we will add a different one. We will then merge
the experimental branch into master.
In [27]:
%%bash
cd test

git branch experiment
git checkout experiment
Switched to branch 'experiment'
In [28]:
%%bash
cd test

echo "Some crazy idea" > experiment.txt
git add experiment.txt
git commit -a -m"Trying something new"
git slog
[experiment e663a7f] Trying something new
 1 file changed, 1 insertion(+)
 create mode 100644 experiment.txt
* e663a7f Trying something new
* 258b69f I like this new name better
* f0163df I have made great progress on this critical matter.
* 8ce7775 This is our first commit
In [29]:
%%bash
cd test

git checkout master
git slog
* 258b69f I like this new name better
* f0163df I have made great progress on this critical matter.
* 8ce7775 This is our first commit
Switched to branch 'master'
In [30]:
%%bash
cd test

echo "All the while, more work goes on in master..." >> file-newname.txt
git commit -a -m"The mainline keeps moving"
git slog
[master 38c854c] The mainline keeps moving
 1 file changed, 1 insertion(+)
* 38c854c The mainline keeps moving
* 258b69f I like this new name better
* f0163df I have made great progress on this critical matter.
* 8ce7775 This is our first commit
By default, all variations of the git log commands only show the
currently active branch. If we want to see all branches, we can ask
for them with the --all flag:
In [33]:
%%bash
cd test

git slog --all
* 38c854c The mainline keeps moving
| * e663a7f Trying something new
|/
* 258b69f I like this new name better
* f0163df I have made great progress on this critical matter.
* 8ce7775 This is our first commit
Above, we can see the commit whose message is Try something new,
that comes from the experiment branch.
In [34]:
%%bash
cd test

ls
file-newname.txt
In [35]:
%%bash
cd test

git merge experiment
git slog
Merge made by the 'recursive' strategy.
 experiment.txt | 1 +
 1 file changed, 1 insertion(+)
 create mode 100644 experiment.txt
*   83a8fc1 Merge branch 'experiment'
|\
| * e663a7f Trying something new
* | 38c854c The mainline keeps moving
|/
* 258b69f I like this new name better
* f0163df I have made great progress on this critical matter.
* 8ce7775 This is our first commit
Using remotes as a single user
We are now going to introduce the concept of a remote repository: a pointer to another copy of the repository that lives on a different location. This can be simply a different path on the filesystem or a server on the internet.
For this discussion, we’ll be using remotes hosted on the GitHub.com service, but you can equally use other services like BitBucket or Gitorious as well as host your own.
In [83]:
%%bash
cd test

ls
echo "Let's see if we have any remote repositories here:"
git remote -v
experiment.txt
file-newname.txt
Let's see if we have any remote repositories here:
Since the above cell didn’t produce any output after the
git remote -v call, it means we have no remote repositories
configured. We will now proceed to do so. Once logged into GitHub, go to
the new repository page and make a
repository called test. Do not check the box that says
Initialize this repository with a README, since we already have an
existing repository here. That option is useful when you’re starting
first at Github and don’t have a repo made already on a local computer.
We can now follow the instructions from the next page:
In [93]:
%%bash
cd test

git remote add origin https://github.com/fperez/test.git
git push -u origin master
Branch master set up to track remote branch master from origin.
To https://github.com/fperez/test.git
 * [new branch]      master -> master
Let’s see the remote situation again:
In [94]:
%%bash
cd test

git remote -v
origin  https://github.com/fperez/test.git (fetch)
origin  https://github.com/fperez/test.git (push)
We can now see this repository publicly on github.
Let’s see how this can be useful for backup and syncing work between two different computers. I’ll simulate a 2nd computer by working in a different directory…
In [95]:
%%bash

# Here I clone my 'test' repo but with a different name, test2, to simulate a 2nd computer
git clone https://github.com/fperez/test.git test2
cd test2
pwd
git remote -v
/Users/fperez/teach/berkeley/2017-stat159/lecture-notes/lectures/git/test2
origin  https://github.com/fperez/test.git (fetch)
origin  https://github.com/fperez/test.git (push)
Cloning into 'test2'...
Let’s now make some changes in one ‘computer’ and synchronize them on the second.
In [96]:
%%bash
cd test2  # working on computer #2

echo "More new content on my experiment" >> experiment.txt
git commit -a -m"More work, on machine #2"
[master 94c7438] More work, on machine #2
 1 file changed, 1 insertion(+)
Now we put this new work up on the github server so it’s available from the internet
In [97]:
%%bash
cd test2

git push
To https://github.com/fperez/test.git
   27b0ec9..94c7438  master -> master
Now let’s fetch that work from machine #1:
In [98]:
%%bash
cd test

git pull
Updating 27b0ec9..94c7438
Fast-forward
 experiment.txt | 1 +
 1 file changed, 1 insertion(+)
From https://github.com/fperez/test
   27b0ec9..94c7438  master     -> origin/master
An important aside: conflict management
While git is very good at merging, if two different branches modify the same file in the same location, it simply can’t decide which change should prevail. At that point, human intervention is necessary to make the decision. Git will help you by marking the location in the file that has a problem, but it’s up to you to resolve the conflict. Let’s see how that works by intentionally creating a conflict.
We start by creating a branch and making a change to our experiment file:
In [99]:
%%bash
cd test

git branch trouble
git checkout trouble
echo "This is going to be a problem..." >> experiment.txt
git commit -a -m"Changes in the trouble branch"
[trouble c480fb4] Changes in the trouble branch
 1 file changed, 1 insertion(+)
Switched to branch 'trouble'
And now we go back to the master branch, where we change the same file:
In [100]:
%%bash
cd test

git checkout master
echo "More work on the master branch..." >> experiment.txt
git commit -a -m"Mainline work"
Your branch is up-to-date with 'origin/master'.
[master a8694ad] Mainline work
 1 file changed, 1 insertion(+)
Switched to branch 'master'
So now let’s see what happens if we try to merge the trouble branch
into master:
In [101]:
%%bash
cd test

git merge trouble
Auto-merging experiment.txt
CONFLICT (content): Merge conflict in experiment.txt
Automatic merge failed; fix conflicts and then commit the result.
Let’s see what git has put into our file:
In [102]:
%%bash
cd test

cat experiment.txt
Some crazy idea
More new content on my experiment
<<<<<<< HEAD
More work on the master branch...
=======
This is going to be a problem...
>>>>>>> trouble
At this point, we go into the file with a text editor, decide which changes to keep, and make a new commit that records our decision. I’ve now made the edits, in this case I decided that both pieces of text were useful, but integrated them with some changes:
In [103]:
%%bash
cd test

cat experiment.txt
Some crazy idea
More new content on my experiment
More work on the master branch...
This is going to be a problem...
Let’s then make our new commit:
In [104]:
%%bash
cd test

git commit -a -m"Completed merge of trouble, fixing conflicts along the way"
git slog
[master 28e0c56] Completed merge of trouble, fixing conflicts along the way
*   28e0c56 Completed merge of trouble, fixing conflicts along the way
|\
| * c480fb4 Changes in the trouble branch
* | a8694ad Mainline work
|/
* 94c7438 More work, on machine #2
*   27b0ec9 Merge branch 'experiment'
|\
| * 2cba531 Trying something new
* | ff8b2ec The mainline keeps moving
|/
* 005d8e2 I like this new name better
* e819b08 I have made great progress on this critical matter.
* 1f299f3 This is our first commit
Note: While it’s a good idea to understand the basics of fixing merge conflicts by hand, in some cases you may find the use of an automated tool useful. Git supports multiple merge tools: a merge tool is a piece of software that conforms to a basic interface and knows how to merge two files into a new one. Since these are typically graphical tools, there are various to choose from for the different operating systems, and as long as they obey a basic command structure, git can work with any of them.
Collaborating on github with a small team
Single remote with shared access: we are going to set up a shared collaboration with one partner (the person sitting next to you). This will show the basic workflow of collaborating on a project with a small team where everyone has write privileges to the same repository.
Note for SVN users: this is similar to the classic SVN workflow, with
the distinction that commit and push are separate steps. SVN, having no
local repository, commits directly to the shared central resource, so to
a first approximation you can think of svn commit as being
synonymous with git commit; git push.
We will have two people, let’s call them Alice and Bob, sharing a repository. Alice will be the owner of the repo and she will give Bob write privileges.
We begin with a simple synchronization example, much like we just did above, but now between two people instead of one person. Otherwise it’s the same:
- Bob clones Alice’s repository.
- Bob makes changes to a file and commits them locally.
- Bob pushes his changes to github.
- Alice pulls Bob’s changes into her own repository.
Next, we will have both parties make non-conflicting changes each, and commit them locally. Then both try to push their changes:
- Alice adds a new file,
alice.txtto the repo and commits. - Bob adds
bob.txtand commits. - Alice pushes to github.
- Bob tries to push to github. What happens here?
The problem is that Bob’s changes create a commit that conflicts with Alice’s, so git refuses to apply them. It forces Bob to first do the merge on his machine, so that if there is a conflict in the merge, Bob deals with the conflict manually (git could try to do the merge on the server, but in that case if there’s a conflict, the server repo would be left in a conflicted state without a human to fix things up). The solution is for Bob to first pull the changes (pull in git is really fetch+merge), and then push again.
Full-contact github: distributed collaboration with large teams
Multiple remotes and merging based on pull request workflow: this is beyond the scope of this brief tutorial, so we’ll simply discuss how it works very briefly, illustrating it with the activity on the IPython github repository.
Git resources
Introductory materials
There are lots of good tutorials and introductions for Git, which you can easily find yourself; this is just a short list of things I’ve found useful. For a beginner, I would recommend the following ‘core’ reading list, and below I mention a few extra resources:
- The smallest, and in the style of this tuorial: git - the simple guide contains ‘just the basics’. Very quick read.
- In my own experience, the most useful resource was Understanding Git Conceptually. Git has a reputation for being hard to use, but I have found that with a clear view of what is actually a very simple internal design, its behavior is remarkably consistent, simple and comprehensible.
- For more detail, see the start of the excellent Pro Git book.
- You can also try Git in your browser thanks to GitHub’s interactive tutorial.
If you are really impatient and just want a quick start, this visual git tutorial may be sufficient. It is nicely illustrated with diagrams that show what happens on the filesystem.
For windows users, an Illustrated Guide to Git on Windows is useful in that it contains also some information about handling SSH (necessary to interface with git hosted on remote servers when collaborating) as well as screenshots of the Windows interface.
Cheat sheets: a useful summary of common commands in PDF format that can be printed for frequent reference. Another nice PDF one.
Beyond the basics
At some point, it will pay off to understand how git itself is built. These two documents, written in a similar spirit, are probably the most useful descriptions of the Git architecture short of diving into the actual implementation. They walk you through how you would go about building a version control system with a little story. By the end you realize that Git’s model is almost an inevitable outcome of the proposed constraints:
The Git parable by Tom Preston-Werner.
Git foundations by Matthew Brett.
Git ready: A great website of posts on specific git-related topics, organized by difficulty.
QGit: an excellent Git GUI.
Git ships by default with gitk and git-gui, a pair of Tk graphical clients to browse a repo and to operate in it. I personally have found qgit to be nicer and easier to use. It is available on modern linux distros, and since it is based on Qt, it should run on OSX and Windows.
Another book-size guide that has useful snippets.
A port of the Hg book’s beginning
The Mercurial book has a reputation for clarity, so Carl Worth decided to port its introductory chapter to Git. It’s a nicely written intro, which is possible in good measure because of how similar the underlying models of Hg and Git ultimately are.
Finally, if you prefer a video presentation, this 1-hour tutorial prepared by the GitHub educational team will walk you through the entire process:
In [105]:
from IPython.display import YouTubeVideo
YouTubeVideo('U8GBXvdmHT4')
Out[105]:
A few useful tips for common tasks
Better shell support
Adding git branch info to your bash prompt and tab completion for git commands and branches is extremely useful. I suggest you at least copy:
You can then source both of these files in your ~/.bashrc and then
set your prompt (I’ll assume you named them as the originals but
starting with a . at the front of the name):
source $HOME/.git-completion.bash
source $HOME/.git-prompt.sh
PS1='[\u@\h \W$(__git_ps1 " (%s)")]\$ '   # adjust this to your prompt liking
See the comments in both of those files for lots of extra functionality they offer.
Embedding Git information in LaTeX documents
(Sent by Yaroslav Halchenko) su I use a Make rule:
# Helper if interested in providing proper version tag within the manuscript
revision.tex: ../misc/revision.tex.in ../.git/index
   GITID=$$(git log -1 | grep -e '^commit' -e '^Date:' | sed  -e 's/^[^ ]* *//g' | tr '\n' ' '); \
   echo $$GITID; \
   sed -e "s/GITID/$$GITID/g" $< >| $@
in the top level Makefile.common which is included in all
subdirectories which actually contain papers (hence all those
../.git). The revision.tex.in file is simply:
% Embed GIT ID revision and date
\def\revision{GITID}
The corresponding paper.pdf depends on revision.tex and includes
the line \input{revision} to load up the actual revision mark.
git export
Git doesn’t have a native export command, but this works just fine:
git archive --prefix=fperez.org/ master | gzip > ~/tmp/source.tgz